Building an Archon-class MSD

Early this year I was reviewing the recent Ships of the Line calendars and stumbled upon an absolutely superb rendering of the fan-made Phalanx-class, which has appeared in the calendar multiple times under a variety of different starship names. I encourage you to look it up if you aren’t familiar with the ship.

Professionally, I have an extensive background in post-production in both TV and film projects. Photoshop, After Effects, 3DS Max and Maya are my daily bread and butter, and in spite of having more model starships than is reasonable, and having a great love of technical drawings, maps, and diagrams, I had never actually tried making one of Star Trek’s famous “Okudagram” Master Systems Displays.

Mostly, I suspect this was just due to a total lack of time and commitment.

I’ve modified existing MSDs in the past – sometimes quite extensively – but there came a point where I simply had enough. If I really wanted to have my own ship rendered in the way that I wanted, I was just going to have to do it myself.

The Archon-class

USS Destiny during a Quantum Slipstream Drive test in 2416. (Source: 26th Fleet, AdmLancel)

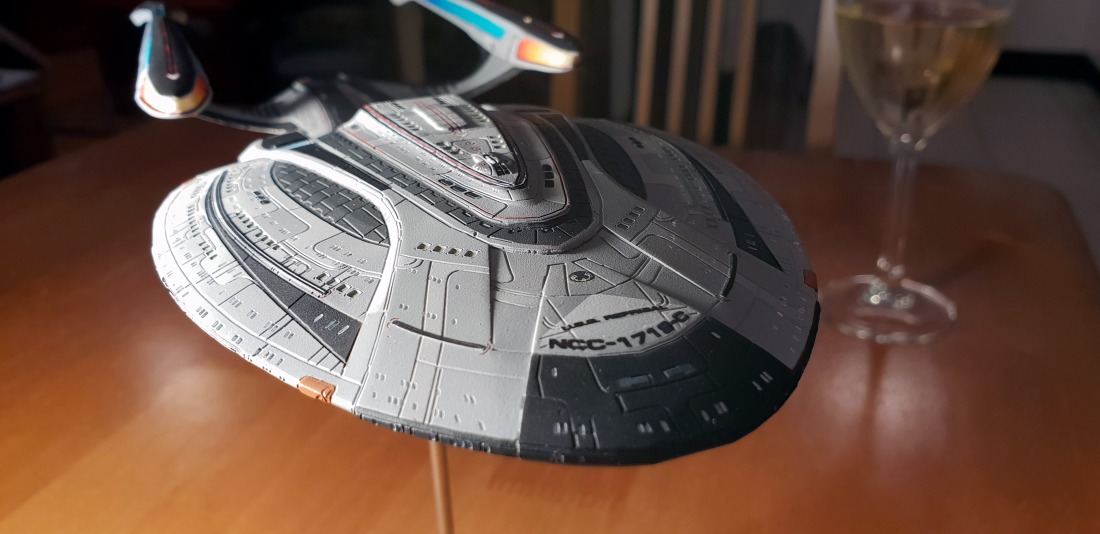
The Archon is Star Trek Online’s successor to the Sovereign-class lineage. Designed and built by Ian “JamJamz” Richards of Cryptic Studios, the ship has a bit of a cult following in some of the game’s community circles, but she’s not without controversy owing to those overly ‘ample nacelles’ that adorn her pylons. Simply put: they are absolutely massive, and many Star Trek Online players spend a lot of time finding combinations of parts to give the ship a reduction mammaplasty. Still, she’s unique and – through virtue of her more obscure status in the wider Star Trek fandom – she has never been explored before.

So what makes the ship special?

Traditionally, Star Trek Online releases new ships based on old classics that are designed to explore aspects of canonical abilities seen by ‘hero’ ships in the shows and movies. The examples are easy to find: If you get a retrofit Intrepid-class, you’ll find it has an ability to use the ablative armour systems seen in Voyager’s finale, End Game. Or, if you get the new spin-off of the Defiant-class (the ‘Valiant’, named after the ill-fated cadet-crewed ship of the same name in Deep Space Nine) you’ll get an ability to fire off barrages of quantum torpedoes; those torpedoes being something that the Defiant was known for during its run on TV.

So how do you define a Sovereign? The Archon is not the first refit of the Sovereign design that we’ve seen. The preceding Regent-class gave it a set of metreon gas launchers that can be ignited to produce ‘The Riker Maneuver’ from Insurrection. The WizKids-exclusive Vizier class variant took this a step further and gave the ship a metreon gas torpedo launcher. So what did they give to the Archon?

A phase cloaking device.

…Wait, what?

Putting my shamelessly technobabbling head into gear, I’ve spent a huge amount of time talking to fellow guild mates exactly why the heck you’d put a phase cloaking device on a ship that was most famous for simply beating the ever-loving hell out of Borg, Son’a, and Remans, and looking fabulous while doing so.

The logical if cynical answer of course, is that Cryptic studios likes to make money, and throwing a very popular cloaking device onto what could be* the most popular class of ship in Star Trek is a bit of a no-brainer.

But I think we can do better. I think the Archon has a dark origin. She was released not long after the conclusion of Cryptic’s Iconian War campaign – a devastating war that saw Starfleet gutted and – by word of one of the game’s developers – so badly depleted that every single member of it’s flagship class of starships (the Odyssey) were either crippled or destroyed. Earth itself came to within minutes of being glassed by an Iconian fleet, and was spared at the last possible moment by an improbable (though some may argue inevitable) moment of Starfleet time travel tomfoolery. All this, after an extraordinary number of vessels were wasted in trying to smash through the walls of the Iconian Dyson sphere in an earlier mission led by a hard-headed Klingon.

…Maybe, just maybe, Starfleet needed something a little bit more drastic. To have been launched so soon after the conflict ended, it seems likely that the Archon class was already in development during the course of the Iconian War. My head canon for the Archon class is that it shall forever be the last-resort Starfleet weapon that never got to fire its guns in anger during the war for which it was designed. Can you think of a better way of getting into a heavily-fortified Dyson sphere than a phase-cloaking device that lets you pass through solid matter? I can’t. And so this is where my theory begins. The other big clue is the fact the ship has curiously-chosen Intelligence-specced seating, implying activities that fall outside the usual loud-and-proud pomp and circumstance of Starfleet fanfare.

Oh yes, the Archon is a dark horse of a ship indeed, and I really wanted to reflect all of this in her Master Systems Display. Here she is…

(Click for full-resolution 22000×5000 .PNG)

The MSD’s basic colour profile is broken down into four simple divisions. Crew areas and other operational equipment is rendered in Pantone 7675 C (violet) while engineering systems are rendered in gold Pantone 728 C. Tactical systems (including phaser banks and torpedo launchers) are rendered in red Panton 172 C, while finally, warp plasma related systems are rendered in a light blue Pantone 2975 C. This palette is maintained across the entire systems diagram.

There are some challenging aspects of the Archon in how she is laid out. An examination of the model in detail (which had to be done before this project) revealed a likely warp core ejection point that was a very long way forward of the one found on the Sovereign-class. What’s more, the Archon has a very large deflector dish which is just a short way forward of that position. Main engineering and the deflector space were probably going to be in very close proximity to one another, which left the question of just how much space could be allotted to the main shuttle bay in the spaces above. While the Archon wouldn’t be the first starship to put a warp core so close to the deflector (the Constitution’s core ran vertically through the ship’s neck, directly behind the deflector dish), it could be the first starship in over a hundred years to do so. Design wise, it made more sense to find ways to fit the two around each other rather than completely reinventing the concept of the deflector as we’ve known it since TNG.

Ventral hull of the Archon class. Note the two red lines marking a possible warp core ejection point. The round port forward of that is identical to one under the stern, meaning it is unlikely to be related.

In short: the Archon’s critical systems are all bundled up into a space that’s quite confined. So long as someone is reasonably good at Tetris, then this isn’t necessarily a bad thing. Traditionally, capital ships could concentrate their key systems in one area, and focus their armour schemes around a single, smaller area of the ship (called a ‘citadel’) for more weight-efficient defence. Notably, this area on the Archon is visibly defined by a grey boundary line that runs up the side of the ship from its ventral hull, to a point as high as the saucer section. It’s plausible (from the perspective of someone trying to make an MSD for this ship) that this area marks the most heavily armoured section of the secondary hull, with thick concentrations of ablative plating and structural reinforcements. This latter point would seemingly be supported by just how wide the secondary hull becomes at those frames.

If that is the case – and I did assume it to be so – then the majority of critical machinery would need to be drawn within that zone.

This quickly brings about a second point of note: the Archon’s bridge is set a very long way aft compared to other classes of vessels. The only other ship that I can think of that has a bridge that far aft on the saucer is the Intrepid class, but she’s a much smaller type. The bottom line is that if I was to be faithful to other ‘large’ ships (particularly the Sovereign) which place a large ODN shaft underneath the bridge to carry the computer network cabling, then some thought would need to be given to the position of other large components including the computer cores themselves. And that’s before I’d even thought about turbolift shafts.

Saucer separation:

Art of the Sovereign class demonstrating saucer separation, by the ship’s designer, John Eaves

A feature of note on the Sovereign-class is the existence of saucer separation. When John Eaves designed the ship back in 1995-1996 ahead of its first appearance in First Contact, he drafted plans that included this capability, and it was never used on screen. This leaves its status in canon as uncertain, but all the same the concept has persisted and numerous drawings of the ship can be found that preserve the saucer separation component, including work by Mr Eaves himself.

As she appears in Star Trek Online, Sovereign doesn’t have saucer separation – but her MSD, made by Cryptic staffer Tim ‘Suricata’ Davies, does. Where does this leave the Archon?

Considering the Archon is the direct successor to the Sovereign-class, I assumed that the mission profiles of the two ships were largely the same. It doesn’t make much sense to produce a follow-on that is somehow less capable than the ship it is replacing, so even if it’s functionally not present within the game for balance or gameplay reasons, I opted to include the suggestion of saucer separation in the Archon’s MSD.

Having said that – a problem that I have almost constantly had with drawings of ships that have saucer separation is just how badly those separation lines cut into its key structures and decks. While an MSD is an abstracted 2D cross section of a ship that has a lot of beam – often combining sections that are far to the port and starboard of the centreline on to a single plate – separation planes are nonetheless difficult to visualise when their slopes visibly cut through areas of decks that are sometimes well over a hundred metres long. In including the separation plane on the Archon, I took care to ‘step it down’ as it moved forward – keeping the interlocks and separation mechanisms contained within their own compartments that, to the very best of my ability, did not needlessly cut into functional spaces around it.

I kept the ship’s battle bridge in the same relative position to that on the Sovereign class, just above and forward of the main navigational deflector, located several decks down below the top of the secondary hull section. An alternate position was considered within the ‘prow’ of the secondary hull, but that was instead – at the suggestion of a friend and collaborator – given over to an intelligence command centre which I will explain a little bit later in this write-up.

The battle bridge, located just above the main deflector, and surrounding areas up to the level of the separation plane.

One fun aspect of the saucer separation capability is the ship’s main shuttlebay. It is horizontally bisected by the separation line. I imagine that during procedures to split the ship in two, the shuttle elevator platforms raise up to the flight deck and effectively seal as air locks with various locking pins clunking into place and buttoning up the section. Secondary doors might then expand either side of the lift shafts to provide the second seal for the engineering section, allowing the hydraulic lifts to pull back and stow themselves. It’s a very clean line which starts at the rear of the shuttlebay flight deck and extending forward, stepping down just before the primary ODN shaft, and again as it approaches the forward transporter rooms.

The very front of the secondary hull section forms a ‘dreadnought-style’ bow which slips away to become the ship’s new prow, and does so at a clean (almost vertical) angle that doesn’t unnecessarily intrude into the operational spaces in that section.

Shuttlebays:

Main flight deck and hangars, located at the back of the saucer section.

The Archon’s got a major point of difference over the Sovereign-class, in that she only has the one large shuttlebay. (The ship’s fantail is a large secondary shuttlebay on the Sovereign, but is a fairly plainly detailed stump on the Archon with no visible doors.) On the face of it, I didn’t realise how much of a logistical challenge this presented in terms of space allocation for shuttles, fighters, and other craft. This meant that in order for the ship to really have enough shuttles (or what I consider to be enough, at least!) it really needed to have a fairly deep hangar hold. That brings the floor of the maintenance hangars down to the top of the ship’s warp core.

Secondary shuttlebay, located at the back of the ventral hull, and backing directly onto Cargo Bay 2.

A through-deck hangar (much like the Galaxy and Akira class) was one possible alternative, but the shallower geometry of the Archon’s saucer section would mean that such an area would very severely reduce the number of useable compartments for things like science labs, transporter rooms, and crew quarters. The hangar and flight deck each occupy a height of two decks, and are – based on the position of the three launch bay doors at the rear of the saucer – wide enough to accomodate multiple small craft side by side. The entire saucer section, from bridge to saucer edge (which is also the lower-most deck with useable space) is only nine decks tall. It would be unusual, in my estimates, to dedicate close to fifty percent of the ship’s primary habitable area over shuttlebays.

The Archon does, however, actually have three other smaller shuttlebays elsewhere on the ship. One of these is rendered on the MSD and is located in the ventral section of the secondary hull, facing aft at the ‘divot’ rise of the keel. Two other, smaller bays are located on the ventral side of the saucer section (port and starboard) facing forward. These latter two shuttlebays are not rendered on the MSD, and would sit in an area close to where I’ve rendered stellar cartography and the primary ODN shaft. The downside of having several small shuttlebays rather than a couple of large ones is that it does limit the ship’s ability to fit larger types of shuttles onboard. Plus side: it meant I could back the secondary shuttlebay directly onto a cargo hold in the ship’s ventral hull, making for an excellent loading bay.

Engineering and Deflector:

As mentioned previously, the warp core of the Archon class seems to be situated well forward of where it was located on the Sovereign, running vertically just behind the main deflector. The three primary considerations on Main Engineering’s position would be the location of the warp core, the line of the main EPS conduit from the warp core intermix chamber to the nacelle pylons, and the physical size of the Main Engineering compartment itself. Having established the position of the warp core along the ship’s length, I cross-referenced it to the level of the nacelle pylons to get the position of the warp core’s reaction chamber.

That marks the centre of main engineering, around which the compartment could be build. This was looking to fall extremely close to the level of the main deflector spaces below, meaning the traditional layout of corridors that run across the ship in front of engineering couldn’t be done. Had the warp core been placed any higher, then the main EPS line would also not properly intersect with the ship’s pylons. The internal layout is likely to have the corridors running down either side of engineering, with turbolift access toward the stern. Of the compromises that could be made, this was probably the best solution I could come up with.

The Engineering compartment is a pretty standard size, being based on the dimensions of the Sovereign class. It sits on deck 17, directly above the deflector control systems. There is an upper Deflector Control room on deck 16 (hello, First Contact reference!) and a second control roo down just above the torpedo magazine, at deck 20.

Less ideal, but still mostly acceptable, the warp core does not have a clear ejection port on the dorsal hull and can only be ejected down through the ventral hull. Directly above the warp core is the lower maintenance deck of the shuttlebay hangars.

The main navigational deflector has a much wider aperture than the one on the Sovereign class, and its structure is closely based on the style of the Phalanx-class master systems display. It’s much less an abstract assembly of geometric shapes, and instead a slightly more detailed rendering of the actual structures, including their mounting spaces, cables, and frames.

I tried to preserve this ‘blocked out’ style across the MSD extensively, with the most obvious second example being the nacelle structure and areas surrounding the plasma injection control centre. I think it’s an effective look that draws the eye – which is helpful because the deflector and the systems around it sit at the very heart of the ship’s operations.

The first of three torpedo launchers sits directly beneath the deflector in an arrangement very similar to the ventral launchers of the Sovereign. Notably, the Archon class has fewer torpedo launchers than the Sovereign itself, with just six of them present in three mounts located here at the ventral fore, the ventral aft, and stern. By comparison, the Sovereign had either ten or eleven torpedo launchers by the end of Nemesis, depending on which analysis you believe.

Curiously, the two classes have an identical balance of torpedo firepower, biased heavily to the aft quarter. Of the Sovereign’s 10 (maybe 11) launchers, six of them face aft, while four of them face forward. It’s a similar story on the Archon, with four launchers facing aft and just two pointed forward. The Archon has no torpedo launchers under her saucer like Sovereign’s turret, though a smaller version of this turret (without a Captain’s yacht) is present on the ship’s fantail.

Considering the stated torpedo armament of these kinds of ships is usually quoted in the hundreds of rounds, I took care to ensure the magazines (complete with loaders) were reasonably large in size.

Intelligence & Assault

It’s written on the packet. The Archon is an Intelligence Assault Cruiser, and while I’ve never been especially sure of what an Assault Cruiser is (aside from a vessel perhaps designed to break through lines and wreak havoc at the centre of the enemy formation) the addition of Intelligence capabilities to the ship is an eyebrow-raiser. Accordingly, I gave the MSD several facilities that directly relate to that mission role.

The Archon’s ‘turret’ position under the saucer doesn’t have the same torpedo launchers that the Sovereign has, and that space is instead occupied by a large, ominous looking black trapezium of unknown function and design. Traditionally, this space on a starship has also been the location of a large sensor array (such as that on the Galaxy class, Excelsior, and even Constitution).

Instead of a standard planetary sensor dome, I chose to put a very large surveillance sensor that, of a particularly extensive and sophisticated type that might be used by Starfleet Intelligence. It pairs nicely with the fact the ship has a cloaking device, after all.

Directly above that sensor, and attached to it, is an Intelligence Operations Centre.

This room is basically one big command centre for members of Starfleet Intelligence to conduct surveillance, analysis, and covert operations deep within the ship. I even baffled the compartment with some cladding to give the spooks some privacy, and it separates the entire area from surrounding sections. The only areas around this command centre are library and research areas, along with a crew lounge and life support systems.

The second thing I thought to add was an area of the lower decks that was dedicated to an embarked MACO contingent or hazard team. MACO was – according to the conjectural opinion of Cryptic’s Thomas Marrone – reinstated in Star Trek Online and ‘wholly subsumed’ by the organisation as ‘marines’.

The MACO section of the Archon, showing shooting range, billets, gymnasium, briefing room, armoury, and CO’s office.

The MACO decks, spanning two levels just above the secondary shuttlebay and Cargo Bay 2, include all manner of facilities that the MACO might need. There is a shooting range, an armoury, quarters, a commander’s office (right next to his quarters), a briefing room, gymnasium, and basic lounge area. This all sits with the conjectural ‘armoured’ section of the ship, and yes – for the keen eyed out there – that is a bathroom with toilets in it. If there is one thing I am most pleased about in completing a Master Systems Display, it’s the fact this ship actually has a loo!

Finally on the intelligence front, there is a mission operations centre directly above the shuttle bay:

I laboured over this area for some time. It’s actually too short within the deck spacing to be a lounge, but it’s also very, very close to the flight deck’s traffic control centre which sits in the ‘bird nest’ that hangs from the flight deck roof. The idea of putting a crew lounge right near air traffic control didn’t seem like an overly smart idea, so the area was instead given over to an orbital mission operations centre, from which I imagine the ship’s security and tactical officers can work with MACO, Hazard Team, and other relevant parties to coordinate the landing of security forces on planetary surfaces. The big windows visible to the aft of the observation platform give excellent visibility toward space over the approaches of the shuttlebay, but – notably – they lack any windows or field of view in the direction of the shuttlebay approach, making it unsuitable for traffic control.

The Archon’s flight deck approach, showing the three doors of the shuttlebay and the observation platform that overlooks it.

Warp Drive

Moving along swiftly, the warp nacelles are something I ended up being quite proud of. Nacelles are not typically something that are well detailed on Master Systems Displays, so I referred to a lot of cutaways and old Trek reference manuals to work out how they all go together. In the end, I fashioned something of a useable machinery space between the bussard collectors and the warp field coils where systems like plasma injectors, control rooms, and power lines could be placed. Of particular note was the Quantum Slipstream Drive envelopes which line each side of the Archon class’s nacelles.

There is very little in the way of canon about the QSD and how it works. Voyager never went into it in any detail, and that particular series often played fast and loose with its engineering treknobabble. It’s an open book, with only a few sets to refer to for inspiration. In Star Trek Online, Starfleet has been playing with QSD technology for over thirty years since the end of Voyager, so I asked the question: How much has it advanced? And what the heck does a Quantum Slipstream Drive coil look like in 2410?

The interior of the Archon class nacelle, showing control rooms, plasma injectors, and the Quantum Slipstream Drive spinnaker.

Thankfully, we do have some idea. The USS Dauntless’s quantum slipstream drive in Voyager was a roughly circular node of devices that surrounded a central core fashioned out of what looked to be a plasma globe. If this was Starfleet’s starting point for inspiration, then that was something I could work with

The orientation of the QSD sleeves on either side of the nacelle makes for interesting internal arrangements. I tried a variety of designs including several ‘molecule model’ spheres chained together in a zig-zag patten. I tried more traditional Trek geometric constructions made out of multiple sized, clean-looking boxes, but none of this really fit within the loosely triangular shape of the sleeve.

In moments of silly frustration, I did look to less serious references. Enter Battlestar Galactica’s invocations of ‘spin up the FTL drive’, or the puppet General Hammond in Episode 200 of Stargate SG1 proclaiming, “I’m the General, and I want it to spin!”.

My mental acrobatics went from what train of thought to another, and before long I was indeed asking myself: “…does a QSD even spin?”

The answer was probably ‘no’, but nonetheless I found myself thinking more about rounded shapes – and that original circular pattern seen in Voyager aboard the Dauntless. I didn’t imagine the device would physically rotate, but it almost certainly had an electrical component that worked within the ‘spindles’ that we saw. Hmm… Spindles… spinning… electrical…

I don’t quite know when the word ‘spinnaker’ entered my mind, but a spinnaker on a sailing vessel is a large sail that is deployed for short periods to to drive the vessel down-wind. They aren’t always appropriate and are stowed when not necessary – which pretty much meets the description of a Quantum Slipstream Drive. It’s a name that stuck as I built it up. I am really, really happy with how it turned out. As an added bonus, it makes for some good bridge banter when the Captain wants the QSD deployed or retracted. I can quite easily imagine “Douse the Socks” being an order issued to bring a ship to impulse.

Get it?

The nacelles themselves have fewer field coils than the Sovereign class (22 pairs vs the Sovereign’s 24) but they are much larger, being at times four or five times heavier towards the front of the engines. Considering just how well-endowed the ship’s nacelles are, I expected that making them balanced would be a reasonable challenge. In the end, they actually came out alright. One consideration is that the nacelles are cambered at an angle of about 30 degrees outboard, which makes them even longer than they appear in a side-orthographic. This is reflected more in the inset graphic I produced to show off the ship’s quantum slipstream envelope, with each blue line intersecting each point of the ship’s main QSD sleeves.

Inset shows EPS power grid, key ODN systems, and the ship’s slipstream envelope.

There are tonne of details buried all over the MSD. From the static ship model displays in the bridge conference room, to observation corridors at the forward lounge that overlook the ship’s inboard areas, to easter eggs and traceable wiring that leads from weapons arrays to small generators and fusion reactors, I tried to step up the level of detail that people generally see in an MSD. As this is my first attempt, I’m proud of the result, and hope you enjoy pouring over it to explore it in depth. Have any suggestions or feedback? Drop me a comment or an email. I’ve love to hear your thoughts.

Some final acknowledgements – I’d simply thank fleet mate @AdmLancel for his constant counsel and being a sounding board for what you see in the MSD, Cryptic’s Tim Davies for the inspiration provided by his own MSDs, Cryptic’s Thomas Marrone for his wonderful Jayces’ Interstellar series (and all its technical details that I relied on to make decisions for this project) and D.M. Phoenix who produced the Phalanx-class and its MSD which probably led me to do this project to begin with.

Cheers.

*Yes yes, I can see you back there, Constitution fans.

Clear All Moorings: Gameprint’s 12″ Artisan Starship Unboxing

Reprisal-Crest

Mrs Koppenflak came home from work today with a surprise for me. A big fat brown box with lots of Polish post office markings on it. After a long trip half-way around the world, and months after the order was placed, my shiny new model of the USS Reprisal had finally arrived.

Was it worth the wait?

Among the first to pick up a ship from Gameprint was Foxman86, who is an associate editor on this blog. Unfortunately, his ship – the Zuikaku – did not survive the trip from Poland to Australia unscathed.

Zuikaku

Oh dear. This made me extremely nervous, as I’d already placed my order and was faced with very similar geographical challenges. It’s entirely possible that Gameprint has altered their packing since the very unfortunate incident above, and thank Spock for that, because these models are not cheap.

Let’s get the obvious benchmark out of the way. This is how Reprisal appears in Star Trek Online:

screenshot_2018-07-19-22-30-36

screenshot_2018-07-19-22-30-24

One very traditional Yorktown class cruiser. And I’d have her no other way – the original Odyssey model by Adam Ilhe and Cryptic’s Adam Logan (now a developer at Bungie) was a wonderful evolution of the Enterprise lineage, and the Yorktown – a further development of the design by Thomas Marrone – in my opinion took the few niggling bugbears of the design and turned it into something really special. As far as my ship is concerned – let’s face it, if you’re going to get a model of the Enterprise-F, you don’t want to stray too far from tradition.

Let’s get started…

Packaging…

Ho Mama. Is this thing secure or what? The ship arrived in a big brown shrink-wrapped box, which contained about a kilogram of packing beads, which were protecting a big black, fancy Gameprint case, (which itself was nicely bound in bubble wrapping) which in turn contained high density foam, cotton wool, and a very securely padded starship that was bound by satin ribbon and foam paper to the bottom of the cut-out foam. Some peace of mind, then! I was already feeling good about this.

Ship arrived in one piece, safe and sound. I don’t think I had a lot to worry about on this. I showed Foxman the packaging before writing this, and he seemed quite convinced that Gameprint had dramatically improved just how they were shipping these out. Significant care was taken in getting this ship out to me.

The Ship…

Typical of 3D prints and other made-to-order casts, Reprisal is printed in resin, which is notorious for deformations that are caused as the material sets following printing. This was my second concern. There have been numerous reports in the community of models arriving with splayed or drooping nacelles and pylons. I’ve built model ships and have been in tabletop wargaming for over 20 years, so I’m more than accustomed to this phenomenon. That said, the print is remarkably clean. There is absolutely no trace of ‘scan lines’ that are so typical of many 3D printers, and while there was some minor bowing in the port nacelle (slightly visible in the last photo above) this was very easily corrected after getting out a hair dryer for two minutes and gently warming the pylon.

It’s a common problem with many Star Trek models that getting nacelles that are parallel and in alignment is difficult. So I’m pleased to say Reprisal is very tidy indeed:

008

Second thing I checked was the surface detail. Based on the photos I’ve seen from others so far, it’s been difficult to determine just how good the bas relief and surface detail is on these models. It’s impressive just how much relief Gameprint has managed to get into this model, and says a lot about how good the translation process between Star Trek Online and Gameprint’s production line really is. Check this out.

009

Every hull plate, every window, every lifepod and phaser array has been rendered crisply without a trace of flashing or visible stepping from the printing process.

This is one very clean model. I’ve uploaded most of these photos at 4k resolution so you can get a feel for the surface finish.

The underside, too – an area of 3D printed models that is sometimes lackluster – is very cleanly resolved and detailed.

010

So what about size?

As advertised, the ship is exactly 30cm (12″) long from the end of the nacelles to the very tip of the prow. Here she is between a 1:1700 Bandai USS Enterprise-E and the Eaglemoss USS Enterprise-D.

011.jpg

The Details…

There is a lot to love. I admit when I hit ‘submit’ on the ship order that I was curious to see whether Gameprint’s artists would actually attempt to replicate Cryptic’s lovely Type 7 ‘Aztec’ pattern when they painted the ship, but realistically, that was always a long-shot.

The paint work on the model is great. Individual hull plates are distinguished in a tasteful two-tone grey, while a dark charcoal picks out her secondary trim. The artists have clearly used a combination of primers and airbrushes to apply most of the base colours as the paint coatings across most of the hull are nice and thin, and under a microscope (or zoom lens) you can just make out the ‘orange peel’ pattern that you typically get from a spray gun.

Pennant lines, trim and other details are picked out nicely by hand-painted brush strokes and they even resolved my simplified fleet logo on the bow astonishingly well for this scale – freehand, no less! Yes, really. Here’s the stylised version:

25

And here’s the bow:

012.jpg

For an insignia that’s barely 4mm wide across the hull, that’s incredibly good!

That photo brings me nicely to the next point: hull markings.

The artists have used printed decals to pick out the ship’s registry in all the appropriate places. There is a little bit of bleeding on the name ‘REPRISAL’ above the registry number, but this is relatively minor complaint that I can live with. You can very faintly make out the edge of the decal markings in many places, but it’s been very well finished using microsol solution to reduce the tell-tale outline of the decal paper and secure it well to the surface of the model. For those non-modellers out there: that means they are not moving any time soon, and won’t slide free from surface contact with the hands.

The blending job on the simulated lighting around areas of detail such as the ship’s flood lights, impulse engines and bussard collectors is similarly very smooth. While I suspect the flood light was achieved through masking and airbrushing, I cannot tell whether hand brushes were used in other areas.

018.jpg

Engine ports and other ‘glowing’ effects are topped in a high-gloss varnish to pick them out and give them a glass-like finish that works well, though that does mean that the sins of the surface smoothness are laid bare. The contours between impulse engines and their housings, or warp grilles and the nacelles, are not perfectly smooth – likely from where the enamel’s inherent viscosity has dried unevenly between the seams. Again, though, the glassy look is great and suits the style of the model.

019.jpg

The free-hand line work around some of the Starfleet pennants is very fine, and clearly not achieved with decals. As far as I can tell, the only places where decals have been used are in places where numbers or names are printed onto the hull. While we’re are it – the bridge itself is a lot of fun, and is packed with little attentions to detail. The entire dorsal hull looks wonderful.

014.jpg

The Verdict…

The big question is: Is it worth the price? I was fortunate enough to order the ship during the introductory price period in April, but factoring in the shipping and the exchange rate (about 75 cents to the US Dollar) this was not a cheap buy, and it’s only gotten more expensive since then.

As models go, this one is definitely on the high-end of cost. The Bandai Enterprise-E shown earlier in this article was a fraction of the cost of this ship, and as a Star Trek model it is hard to say with a straight face that the better part of what is now $500 US is a sum of money that I would part with again.

How much you’re willing to pay to have a permanent keepsake of your favourite Star Trek Online ship is going to be a very personal decision. I have played STO almost continuously since late 2010, and the vast majority of that time has been with the USS Reprisal.

Depending on what you want, the offerings from Eaglemoss for an Odyssey or Vesta may suit you just fine. Or alternatively, Gameprint now offers much more affordable full-colour 3D prints which aren’t going to be quite as detailed or as nicely finished as their artisan pieces.

The bottom line is: I am glad I bought this model, and I think I would have regretted it had I missed the introductory price point.

I will, in all probability, be ordering the less-expensive 3D models from Gameprint in the future. I will provide an update when that happens.

Until then, clear skies, Captains!

021.jpg

022

023

Delta-v: Engine Efficiency

RamilliesSpeed

Soon I’m going to be posting my build for the USS Ramillies, but before that, I want to talk about an aspect of power management that some may not realise.

Efficiency, and how it’s applied.

‘Efficiency’, as a term of game mechanics, refers to a starship’s effective overall subsystem power levels against the amount of base investment that is needed to produce that number.

Subsystem power is one of the least-taught and most important parts of a ship’s performance, as it affects absolutely every last facet of its key characteristics, abilities, and skills that you use. A starship has four major subsystems – weapons, shields, engines, and auxilliary – and the amount of power that is available to each of these subsystems directly determines how effective each area of your ship is.

In general terms:

The weapons subsystem affects the damage output of all directed energy weapons (cannons, beams).

The shields subsystem affects both your shields’ innate ‘hardness’ (how much damage they can reduce through resistance) and regeneration rates.

The engines subsystem affects your speed and maneuverability (and consequently, your ability to evade certain AOE debuffs such as gravity well.)

The auxilliary subsystem affects the performance of your scientific abilities (such as the aforementioned gravity well, or perhaps sensor sweep) in addition to the effectiveness of many resistance heals and immunities – including Aux to Structural, Hazard Emitters, and Polarize Hull.

Each subsystem has a minimum power setting of 15 and a maximum power setting of 100.

Overall, a starship has – base – 200 units of power to distribute across its subsystems in whatever configuration its captain wants. By default, each subsystem will have 50 units of power in each of its four subsystems. Furthermore, the base stats of a piece of equipment will always display its expect performance against that 100 mark. If you have less than 100 power in a subsystem, then your equipment will not perform as well as its tooltip and stats suggests it can, but if you have more than that, then it can and will exceed its listed statistics.

Without using certain bonus modifiers (such as warp cores that may increase a subsystem’s power cap, or bridge officer abilities such as Overload Subsystem Safeties), a subsystem’s power can go no higher than a setting 125. With a maximum power investment of 100 – this is where the importance of efficiency becomes apparent, as it is the only way you will be able to maximise the performance of your systems and equipment.

If you invest in efficiency at all, you will see your starship’s subsystems can read well above the levels at which you’ve set them to. As a rule, all efficiency is subject to diminishing returns: the less energy you put into a subsystem, the greater the bonus power you will receive in that section. This bonus number decreases as you approach a power level of 75, and after that point – you receive no further bonus at all.

In a perfect world, your starship could have 125 power in each of its four subsystems and would perform exceedingly well in every aspect of its operations. Given finite power supply however, you will always be forced to weigh up your mission priorities, and compromises must be made.

It would be almost pointless to put efficiency skills into weapons, if that is a subsystem that is constantly run at over 75 power. Naturally, you’re better off spending that skill point on another system you intend to sacrifice – such as engines. (Sacrificing engine power to squeeze more out of weapons or auxilliary is a very common choice, and more often than not leads to engines running with a minimum of power.)

Power management is a discussion unto itself, and efficiency is a huge part of it, but the mechanics of efficiency have a tendency to guid other build decisions when the same word is used. In particular; with engines.

I have often heard it said that there is no point in running a hyper impulse engine that is ‘efficient at high power levels’ when there is no bonus to efficiency above 75 power. This is simply false.

There are – with a couple of unusual exceptions – three basic engine types in Star Trek Online.

Standard impulse engines are advertised as having no efficiency modifiers whatsoever and perform at a flat rate commensurate to the amount of power they are provided.

Combat impulse engines, the game tells us, are ‘efficient at low power levels’, suggesting that they provide better performance at low power levels than other engines.

Hyper impulse engines are similarly ‘efficient at high power levels’.

Given what we know about efficiency and power management in STO, with diminishing returns and disappearing bonuses at high power levels, how does that affect your choice of engines? The fact that there is no efficiency bonus above 75 power would suggest that there is very limited benefit to running hyper-impulse engines which benefit from ‘high power levels’, right?

If you assume ‘efficiency’ is governed by the same rules across the board, you would be wrong.

The same diminishing returns that affect your subsystem efficiencies have absolutely nothing to do with the performance of your engines, no matter what type you have chosen. And this can be demonstrated through testing.

Power12

The above is a graph charted using my build for the USS Ramillies, using standard Mk XIV (common!) impulse engines of each of the three types.

Engines.png

I used common (white), non-reputation engines for this test because – free of modifiers – they are a control that won’t be affected by more esoteric statistics, including [spd] modifiers or other rarity bonuses. This is as close to raw engine data as I can get without datamining, with stepped increases in power to assess performance figures. (Displayed across the bottom, with the ‘real’ power figure against the base power figure)

The vertical axis displays the ship’s registered impulse speed at the indicated power level.

I tried this test with Mk X, Mk XI, XII, Mk XIII and Mk XIV engines, expecting that perhaps higher marks could have different efficiency ratings. Surprisingly, the graph ended up identical in profile, and the pattern was repeated in each series.
The blue series is the standard impulse engine. The red series is the combat impulse engine, and the green series is the hyper impulse engine.

The combat impulse engines reach their ‘best’ power-thrust ratio at about 56 power, while hyper combat impulse engines begin accelerating more sharply past about 90.

In every single case: the point of equilibrium in efficiency for impulse engines is a flat number of 60. At this mark, all three engines perform identically in every respect.

Above 60 power, then the clear winner in all conditions is the hyper-impulse engine.

What can be concluded from this?

How much importance you put in your raw power levels is going to dramatically influence what engine you should be favouring. I’m going to go into power a lot more with the Ramillies and Reprisal builds, but the short answer is this:

If your engine power – through efficiency or choice – runs higher than 60 during combat (the time that matters most) then you you will get more benefit from a hyper or standard impulse engine mthan you will from a combat impulse engine, in all conceivable circumstances.

At endgame, it is unlikely that you will have less than 60 subsystem power as a Federation captain, and even less likely if you are an escort pilot running Emergency Power to Engines as a speed tanking skill. It is very difficult to recommend combat impulse engines when pursuing a Starfleet build.

During levelling, it becomes very easy indeed to recommend combat impulse engines. With limited power to invest, and very few efficiency skills, every point matters and combat impulse engines are an excellent choice between about levels one and 40.

Romulan captains (faced with Warbirds that have less power potential than equivalent Federation and Klingon ships due to the reduced power output of singularity cores) will likely find more utility from combat impulse engines.

As a final thought – just how dramatic is the difference between a Mk XIV common engine and a Mk XIV reputation engine, such as the Iconian resistance hyper-impulse engine?

Power11

It’s significant, and at a glance,  the purple line (Iconian Engine) shows just how much better reputation gear can be over its basic equivalents.

Next time, I’ll talk about power and how it factors into the Ramillies and Reprisal as a basic requirement of design.


Flashback: Deep Space Encounters

OldESD
Earth Spacedock, as it appeared from 2010 until April 2014. Image Credit: RachelGarrett | sto.gamepedia

In 2010, Star Trek Online was a far less forgiving game than the one is played today. Today it is possible to travel through each of the galaxy’s four quadrants in single trips as part of a large, open map. But at the time of the game’s launch, it was a very different story.

At the outset of this opinion piece, I will say: I think Star Trek Online has lost a potentially amazing experience that cannot be repeated again in the game as it exists today. And I shall explain why.

This is my story of how an exercise in dipping my toes into the pool became an eight-year journey that continues today.

In 2010, the galaxy was divided into sector blocks – each of which was level-banded and matched to the levels you were expected to hit when you reached those territories in the course of story missions. This was far more in line with the open worlds of other MMOs: journeying through sector space to your next destination was fraught with risk and danger. Sector space was filled with hostile NPCs who would follow your vessel if you flew too close to them, and drew their attention. Of course, these NPCs were the same level band as the sector block they patrolled. Those around Federation space in the Vulcan sector were low level opponents, while those in the end-game regions around Deep Space Nine and Gamma Orionis were much higher; at levels 40 to 50.

Star_Trek_Online_Galaxy_map
The original sector blocks of Star Trek Online, showing the Alpha and Beta Quadrants, and their discreet divisions. Image Credit: Cryptic Studios, 2011.

Needless to say, for tyro captains in their first Miranda-class light cruiser, venturing (or more accurately, straying) into a sector well outside your level bracket was a hazardous and naively foolish thing to do. You could potentially find your Miranda venturing through Borg space at warp five, while a Borg Cube pursued you at speed better than warp nine. If you were not prepared for this, then what happened next was usually regrettable.

If you were intercepted by these hostile NPCs in sector space, you would be automatically dragged kicking and screaming into an open-instance deep space encounter wherein you would need to defend yourself against enemy ships, and then destroy them.

Either that, or they destroyed you.

And so it was in 2010 that the intrepid and daring Lieutenant James Hawkins of the starship USS Hyperion decided, after defeating the Borg at Vega colony, (ah, yes, the foolish delusions of badassey at level 10) and rescuing the badly-damaged USS Khitomer, that the single most important thing he could do in his fledgling Starfleet carrer was to see the universe and visit the most famous space station in the galaxy: Deep Space Nine.

Deep Space Nine, of course, resided right in the middle of a level-40 True-Way-infested rats nest of Cardassian and Terran piracy called the Beta Ursae Sector Block.

With orders from Spacedock to go investigate some silly Vulcan monastery on P’Jem, Hawkins instead ordered the Hyperion to take a right turn after leaving Earth and thus entered Cardassian space. Immediately, he set a course for Deep Space Nine. It didn’t take long for the ridiculously out-of-place Miranda-class starship to be spotted by Terran Empire starships that patrolled sector space, and it was pulled into a Deep Space Encounter at the sort of odds that even the imperious James Kirk might have thought better of.

Alas, there was no way the badly outdated engines of the Miranda class could escape the Terrans, and Hawkins resolved himself to the simple fact that in his brazen impatience to see Deep Space Nine, he was probably going to be atomized and have his debris scattered over the better part of a sector. Not without a fight, of course. (Indeed, this entire excursion probably began with the words ‘never tell me the odds.)

Fate, however, deigned that better things awaited the tyro Lieutenant.

The young and inexperienced captain couldn’t do much as the first wave of Terran ships that awaited him in this encounter opened fire. Level 40 phasers against a Mark-II uncommon standard shield array need to only fire one or two shots before your ship has sufficient air holes in its engine room (we swear it makes it go faster) to personally wave your head out of the hole and wave a white flag from the safety of a space suit.

Actually, that last part isn’t true. This was a dark age of Star Trek Online that predated the Nukara Strike Force, and thus I am entitled to say that back in my day, we didn’t have these fancy space suits (No, really. EV suits didn’t exist at this point). We had a plastic bag (which is now banned) and a fire extinguisher from ‘Researcher Rescue’. And we had to share the extinguisher.

The point is that my ship was unquestionably exploding, and there was absolutely nothing I could do about it.

As shields failed and the hull was breached, a voice could be heard in the back of Hawkins’ mind. “Sir… there’s another ship coming in…”

I will take a moment in the retelling of this story to make something very clear: This actually happened.

Sweeping in front of the mauled USS Hyperion, a huge level-45 Sovereign-class assault cruiser let fly with more firepower than I thought was ever reasonable for a spaceship to have in a Star Trek game. Beams and torpedoes lanced through the attacking Terrans as the Assault Cruiser put itself between them and the appallingly out-matched Miranda. Before long, the Terrans were destroyed, and the Sovereign pulled alongside the ruined Miranda and began sending over as many engineering teams and hazard emitters buffs as it could find. I received a message from the captain of the Sovereign that was rather blunt. “You shouldn’t be here.”

I wasn’t exactly in a position to disagree.  I’d made a terrible mistake and promptly accepted the Sovereign player’s very kind offer to escort me back to a safer region of space. Dutifully, the kind player did indeed invite me to a team, bumped my level up to 45 to avoid the aggro of the other NPC mobs in Beta Ursae, and took me all the way back to the Sirius Sector Block, and the relative safety of Federation space.

Let it also be said that some of my fondest memories come from the occasions where I got to be the hero, and made some anonymous Star Trek fan’s day just a little bit brighter in deep space.

A couple of years later, Cryptic would finally remove these roving deep space encounters and replace them with the queued system for encounters that we have now. Too many players had decided that random pursuits through sector space were ‘ruining their fun’, and more’s the pity. The encounter of a vastly powerful Sovereign class starship swooping into save a hapless low-level Miranda is the kind of thing Star Trek is made of, and I hold that it’s a terrible shame that players will no longer be able to experience that sort of moment.

I took away one enduring determination from the encounter with that Sovereign. Oh yes… I would have that ship, and then it would be me doing the rescuing. Let it be said that some of my fondest memories in this game from the occasions where I got to be the hero, and made some anonymous Star Trek fan’s day just a little bit brighter in deep space.

That Assault Cruiser – whose name has been unfortunately lost to time – left an indelible impression on the kind of ship I’d want to fly.

That was when a brief look at a game that piqued my curiosity garnered my complete and undivided attention.

Welcome to the Yards

Hello, and welcome to Shipyard 25 – a project by shipwrights of the Equator Alliance armada to share builds, strategies theories, and opinions in Star Trek Online.

We hail from a number of different of different fleets, including the Southern Cross High Guard, (25th Fleet ‘Southern Cross’ in STO), Dark Allies, and 101st Fleet, and we are passionate about shipcrafting, with experience going back as far as the game’s launch in 2010.

It’s a different take on the usual discussions of the DPS meta. How and why? Because we’re first and foremost Star Trek fans, and the way we build ships reflects the things we love about the franchise. We often build to ‘canon’ specifications, we build to niches, and we build to have fun – all while being as effective as possible in a given brief.

We wager that if you want to build an excellent representation of the Enterprise, the Defiant, or any other starship that may have graced the television and movie screens, you will enjoy the ones we bring you in this ongoing project.

We’ll also explain our builds and their design decisions in detail, and may occasionally try to entertain with background, war stories, and history.

Also, we will look at the state of the game in periodic updates as new content, abilities, traits and ships head our way in game, and we’ll happily point you in the direction of community discussions, news and announcements.

Shipyard 25 is a blog, newsletter, guide and waystation on everything Star Trek Online – and in time, maybe a few other galaxies, too.

This project is in its early stages, and it’ll take us a while to work out a formula that works. Help us out! Let us know what works, what doesn’t, and what you want to see more of.

Second star to the right, and straight on til’ morning.

-Koppenflak